![[object Object]](/static/SBI-new-3f05b8e8a65d5a738bcbf2b4b08ae8c3.svg)
![[object Object]](/static/HDFC-new-bbc46138c322f4e8beb5ef76c57a6aff.svg)


 All Tech Blogs
Mobile
All Tech Blogs


In our previous blog, we explored the numerous benefits of using Server-Driven UI (SDUI) over traditional native approaches. We also briefly discussed the three core components of LiquidUI – Server Driven UI Framework at PhonePe.
We touched on how these components interact to power server-driven UI at PhonePe. In this installment, we’ll dive into the technical details of LiquidUI’s Native Client SDK. We’ll uncover how its internal components enable developers to create complex SDUI workflows. Let’s get started!
LiquidUI Spec is a tree representation of a workflow crafted on LiquidUI web console. This spec is converted into JSON and stored in a Config Store (Chimera). The App downloads this JSON and, using the Client LiquidUI SDK, converts it into a fully functional native workflow.
A Spec comprises of following components:
These components form a rich toolkit, enabling developers to build SDUI workflows. Let’s take a closer look at each of these components.
Any complex screen can be broken down into nested renderers(or layouts) and widgets. This gives us the initial structure to build a screen using LiquidUI. Let’s take an example of a screen.
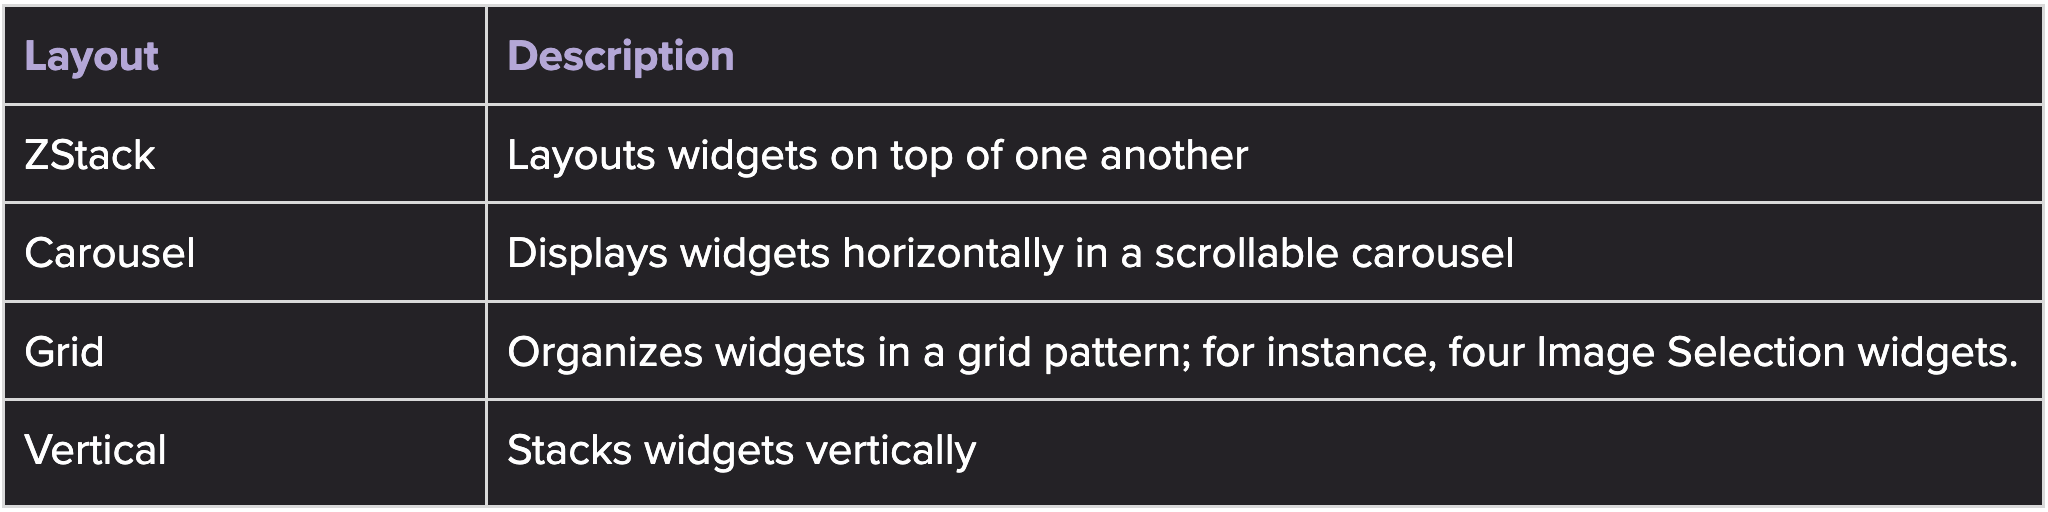
A LiquidUI screen can have a Navigation Bar and 3 root-level renderers as shown on the left side of the above diagram:
Developers can add widgets and nested renderers within these root-level renderers.
The screen on the right side of the diagram comprises four distinct renderers inside the main Renderer, each containing various widgets. Let’s delve into the specifics of each renderer:
Doing this exercise of deconstructing a screen into nested renderers and widgets is a crucial step in the journey of constructing a screen in the LiquidUI Web console.
Now that we have deconstructed the screen into nested renderers and widgets, it’s time to identify the widgets that best fit our specific needs. LiquidUI boasts a diverse library of over 40 widgets – including textfield, stepper, slider, date picker, button, text, image, button, and info card, with more being added regularly. The console widget picker even provides handy previews, making widget selection a breeze.
Each widget in LiquidUI has defined attributes and a specific UI function. For instance, a date picker widget lets users select dates and have attributes like default date value, min/max date, and display format. An info card widget has attributes like an array of texts, left image, and right image.
A new widget is created and its attributes are defined using the console’s widget creation tool. Developers can define these attributes using primitive types (String, Int, Double, and Bool), or opt for custom types (TextModel, ImageModel, ButtonModel). For instance, the text in the date picker widget is of type TextModel. Attributes can also support collections, such as an Array of TextModel for an info card’s texts property.
TextModel Custom Type Definition:
New custom types can be on-boarded onto the LiquidUI Console, allowing developers to create custom data models tailored to specific needs.
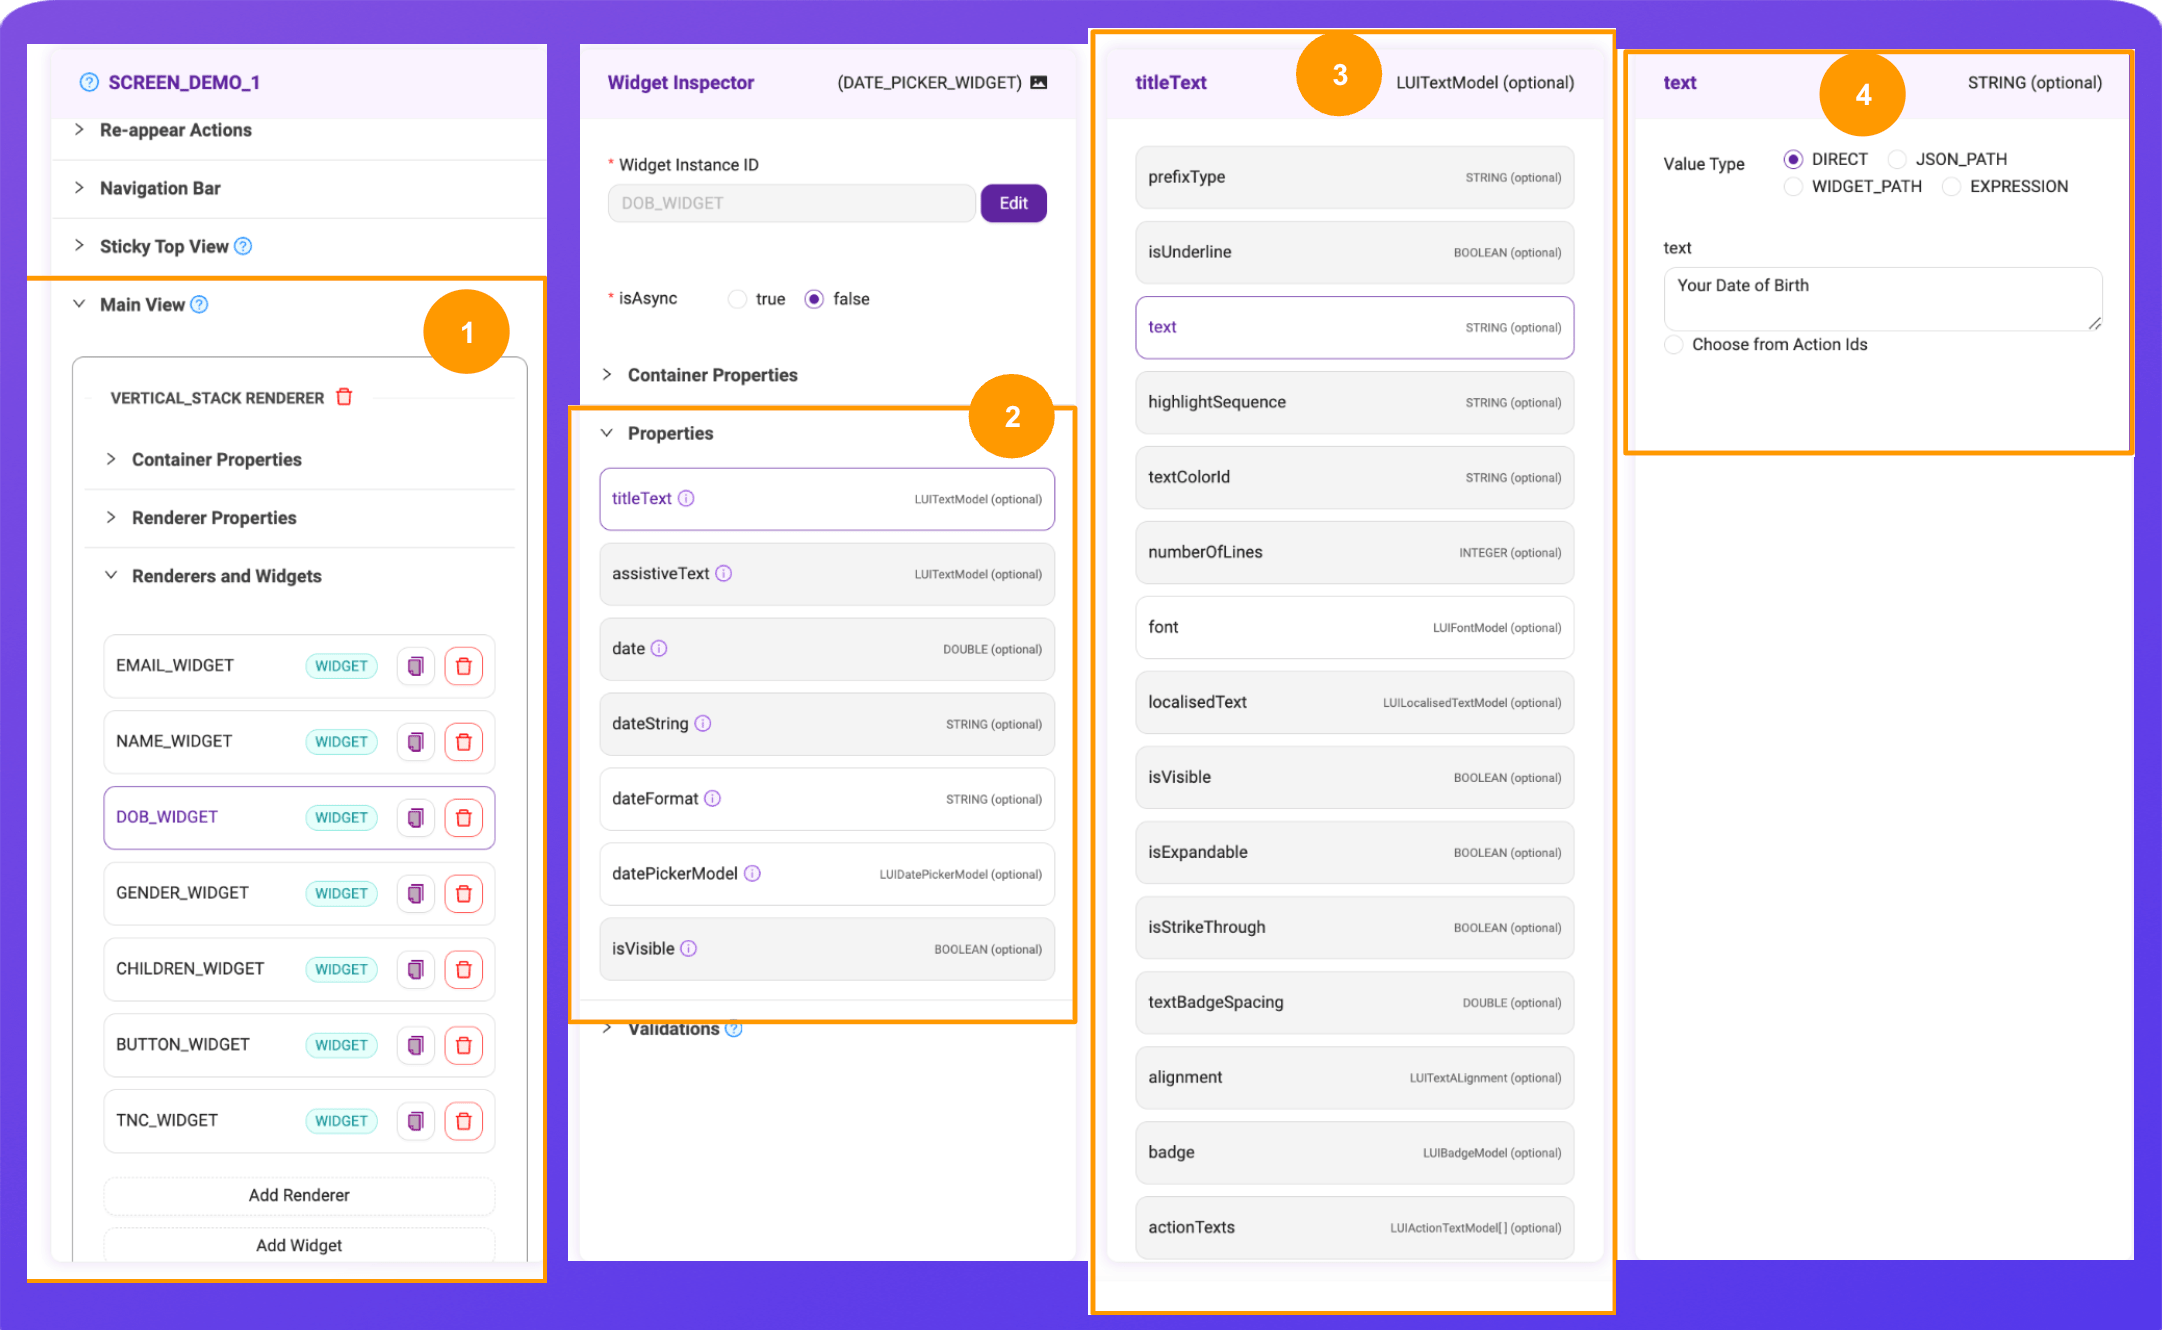
On opening a screen in Web Console you’ll see these sections:
While working with these attributes on the console, developers can give either a static value or a binding to consume dynamic data.
Static data is known at the time of crafting the spec whereas data is considered dynamic if it gets generated at runtime. Examples include:
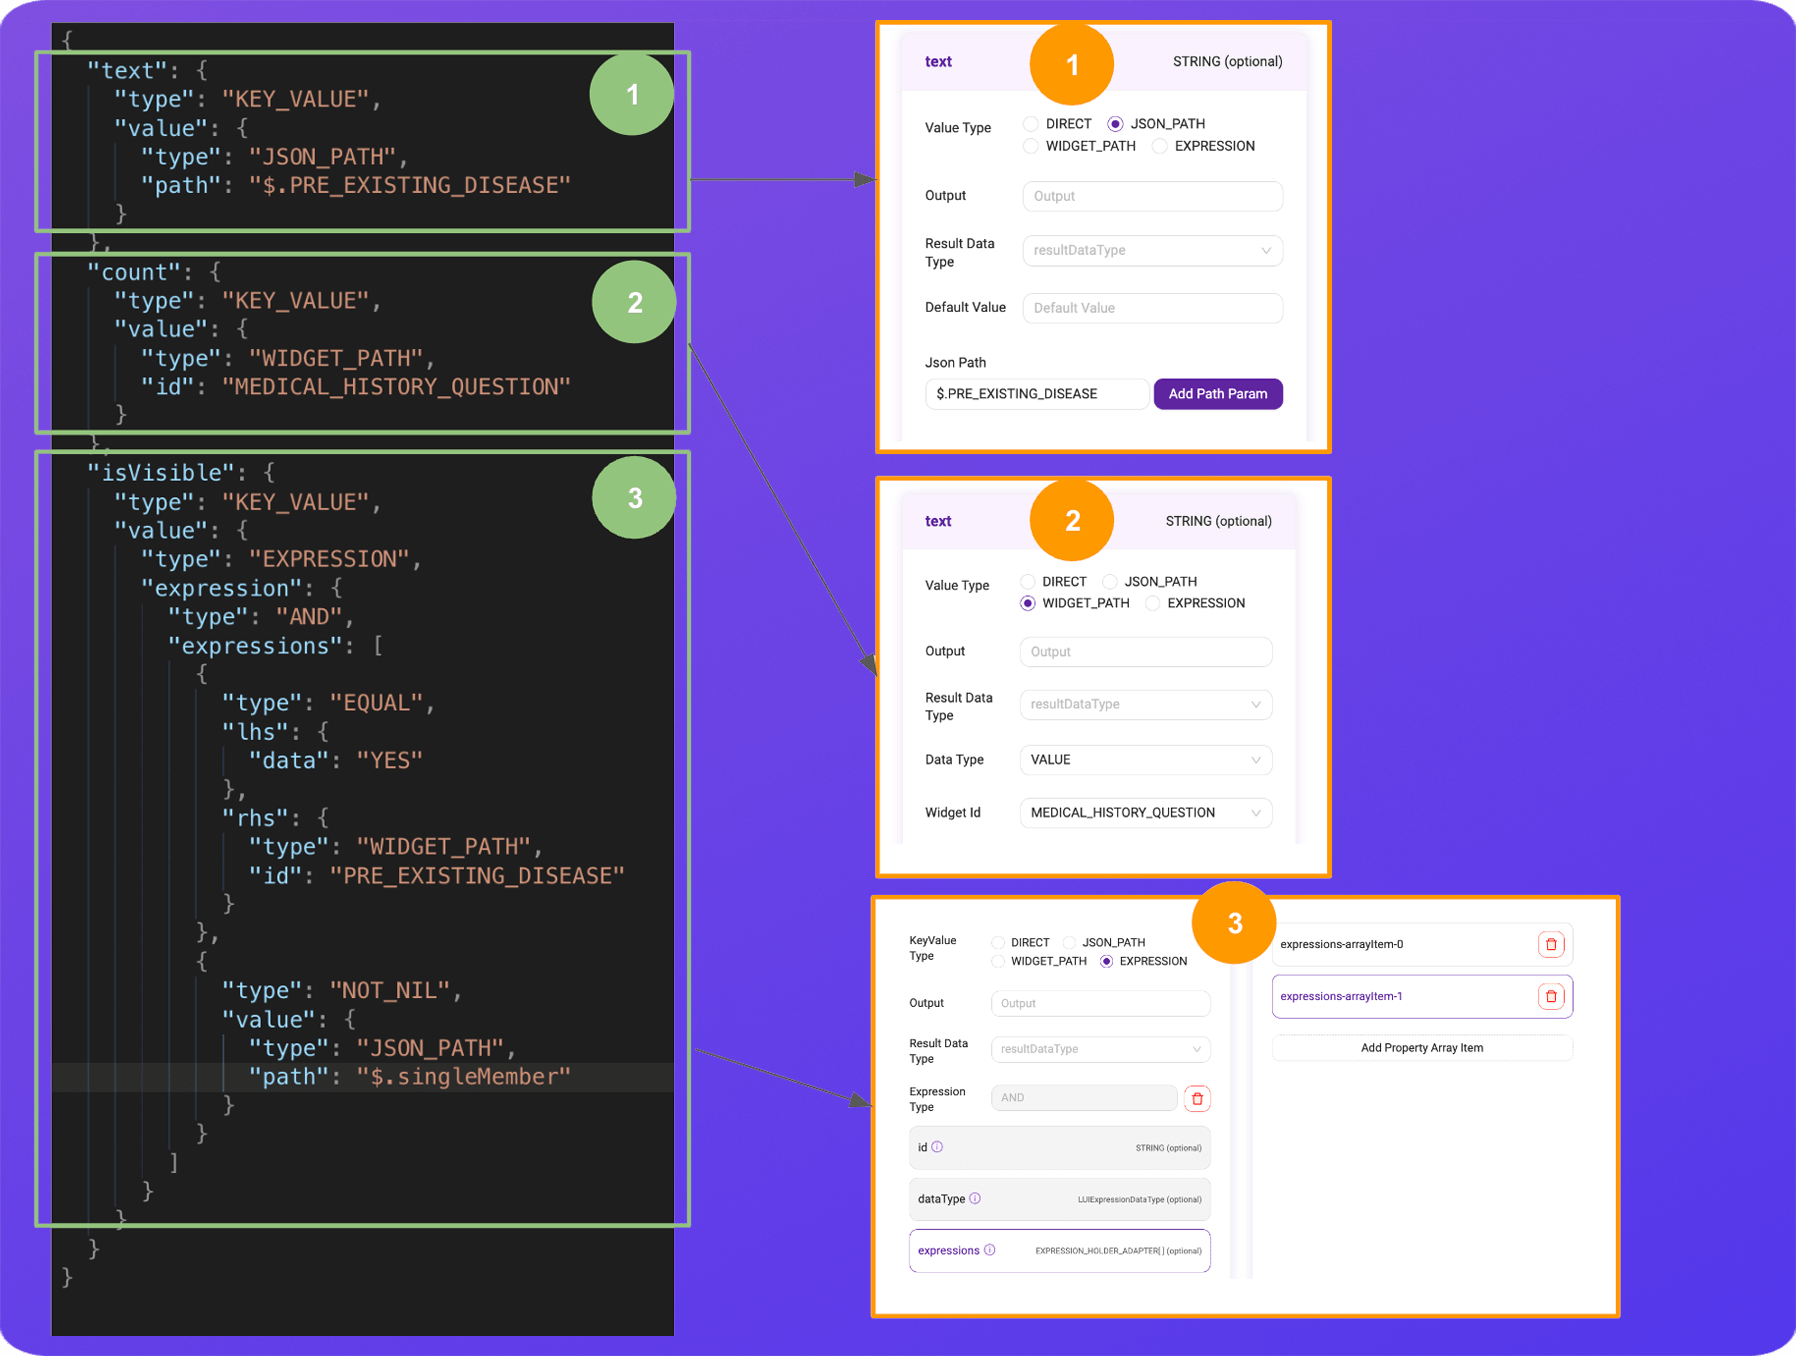
LiquidUI enables you to define schemas to bind dynamic data to UI by providing three options:
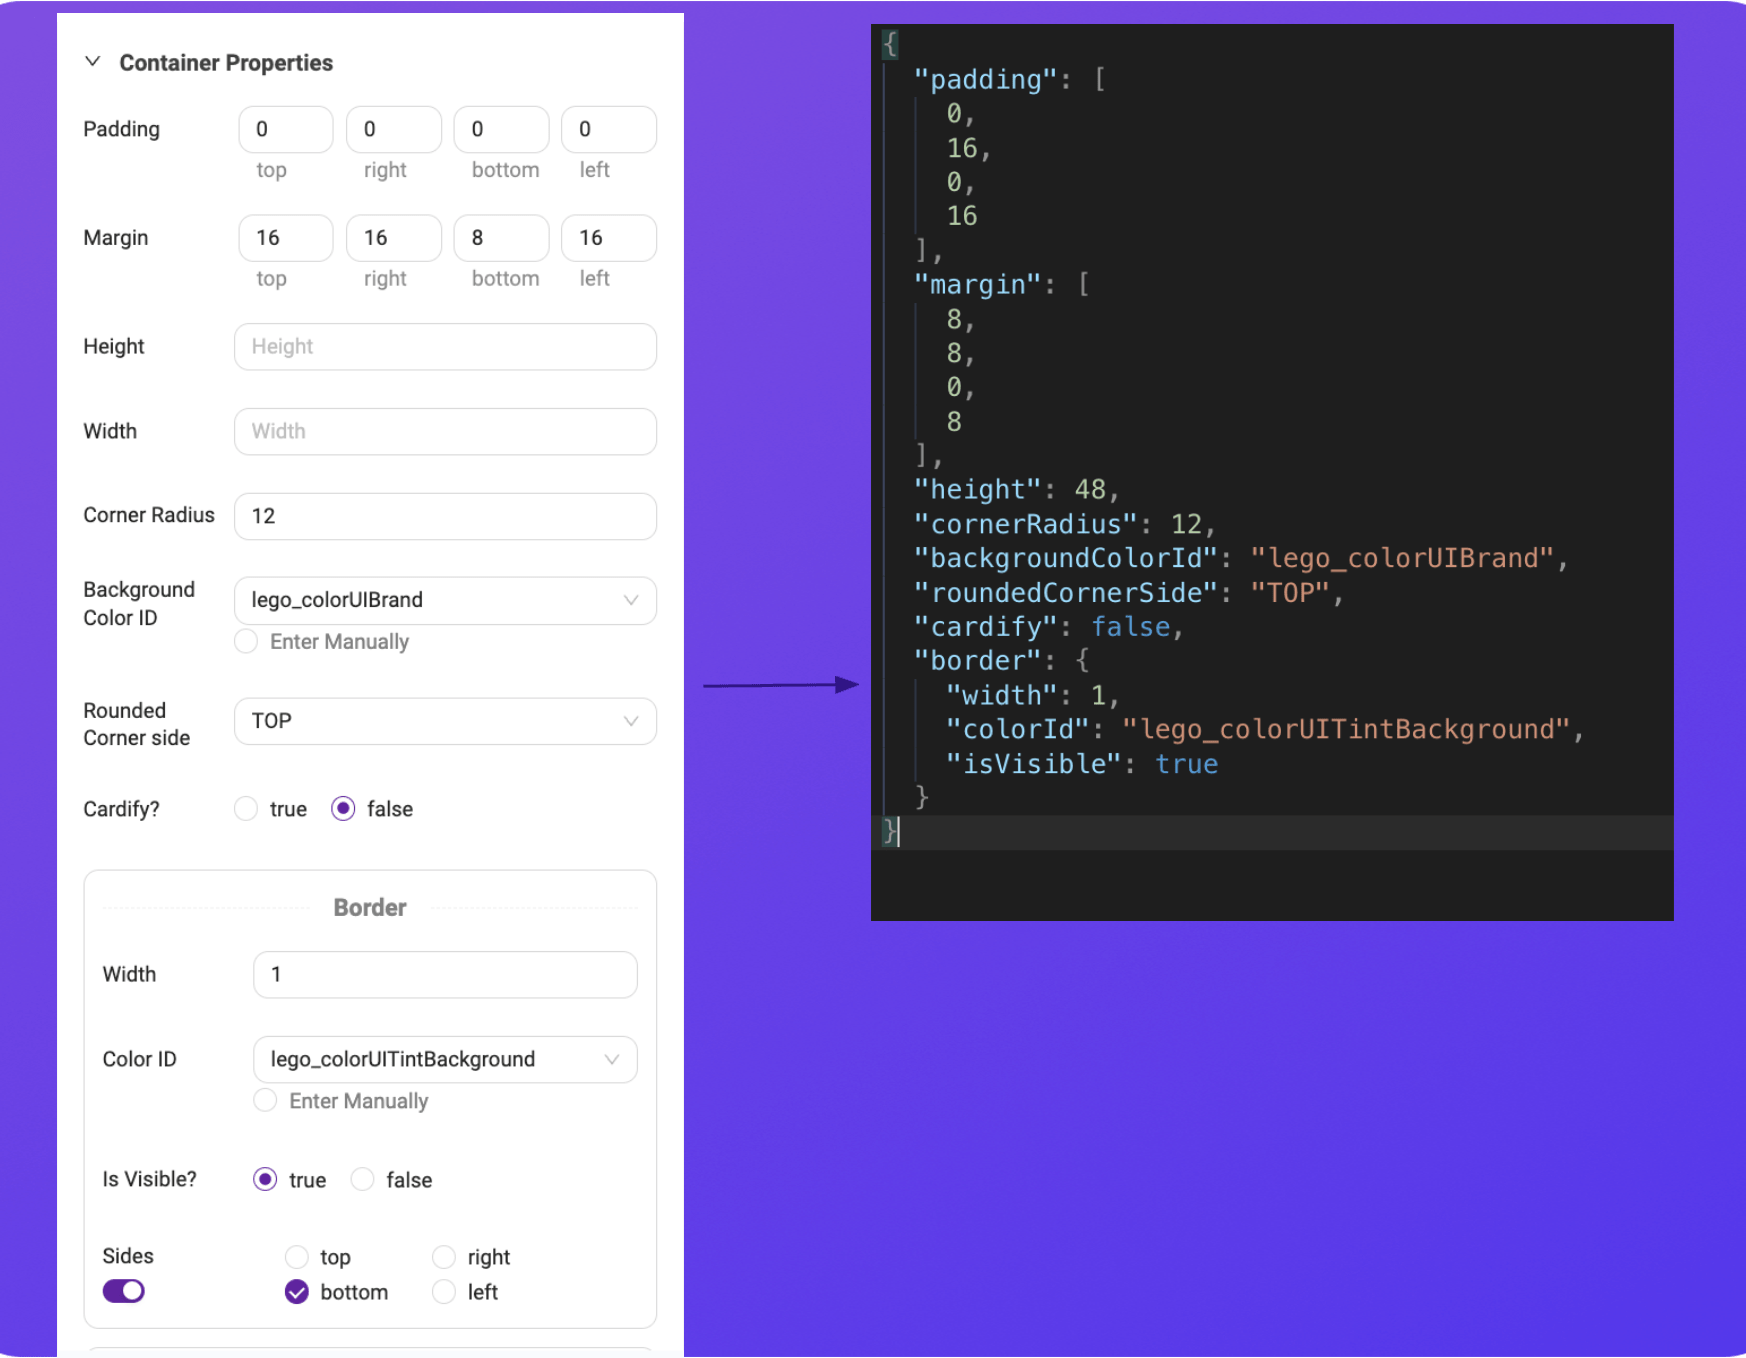
The below diagram illustrates the Web Console UI for binding dynamic values to an attribute. It also displays the JSON received on the app.
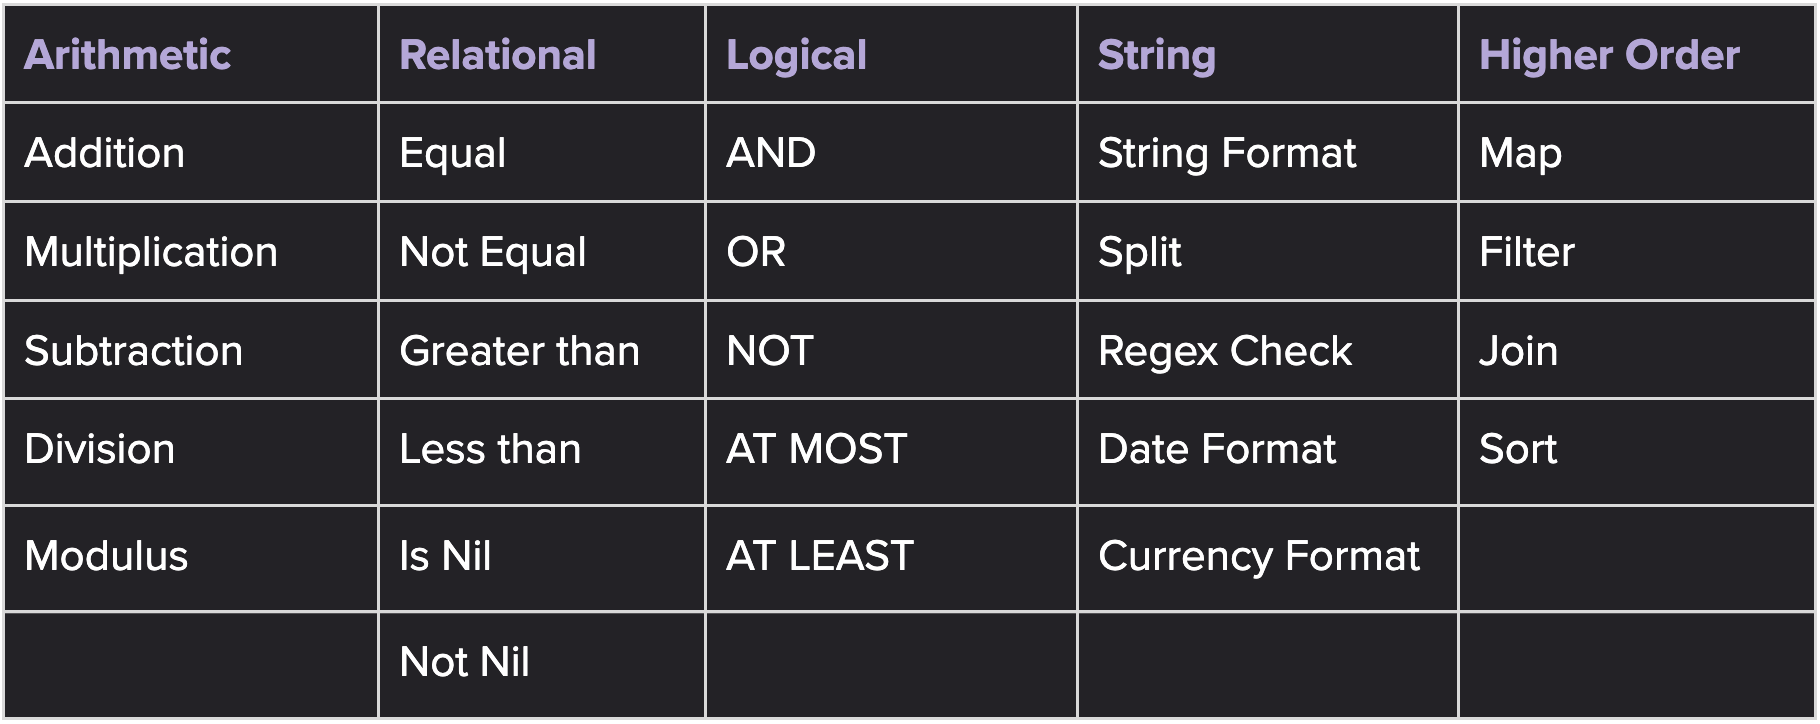
Supported Expressions in LiquidUI:
After selecting a widget inside a renderer, developers can customize its visual attributes – such as border, background color, padding, corner radius, gradient, and more. These attributes are standard across all widgets and do not depend on the widget type. Developers can assign only static values to these attributes.
Now that we know how a screen UI is crafted using Renderers and Widgets, it’s time to make our screen responsive and interactive. LiquidUI’s actions and event-handling infrastructure enable users to interact seamlessly with the UI.
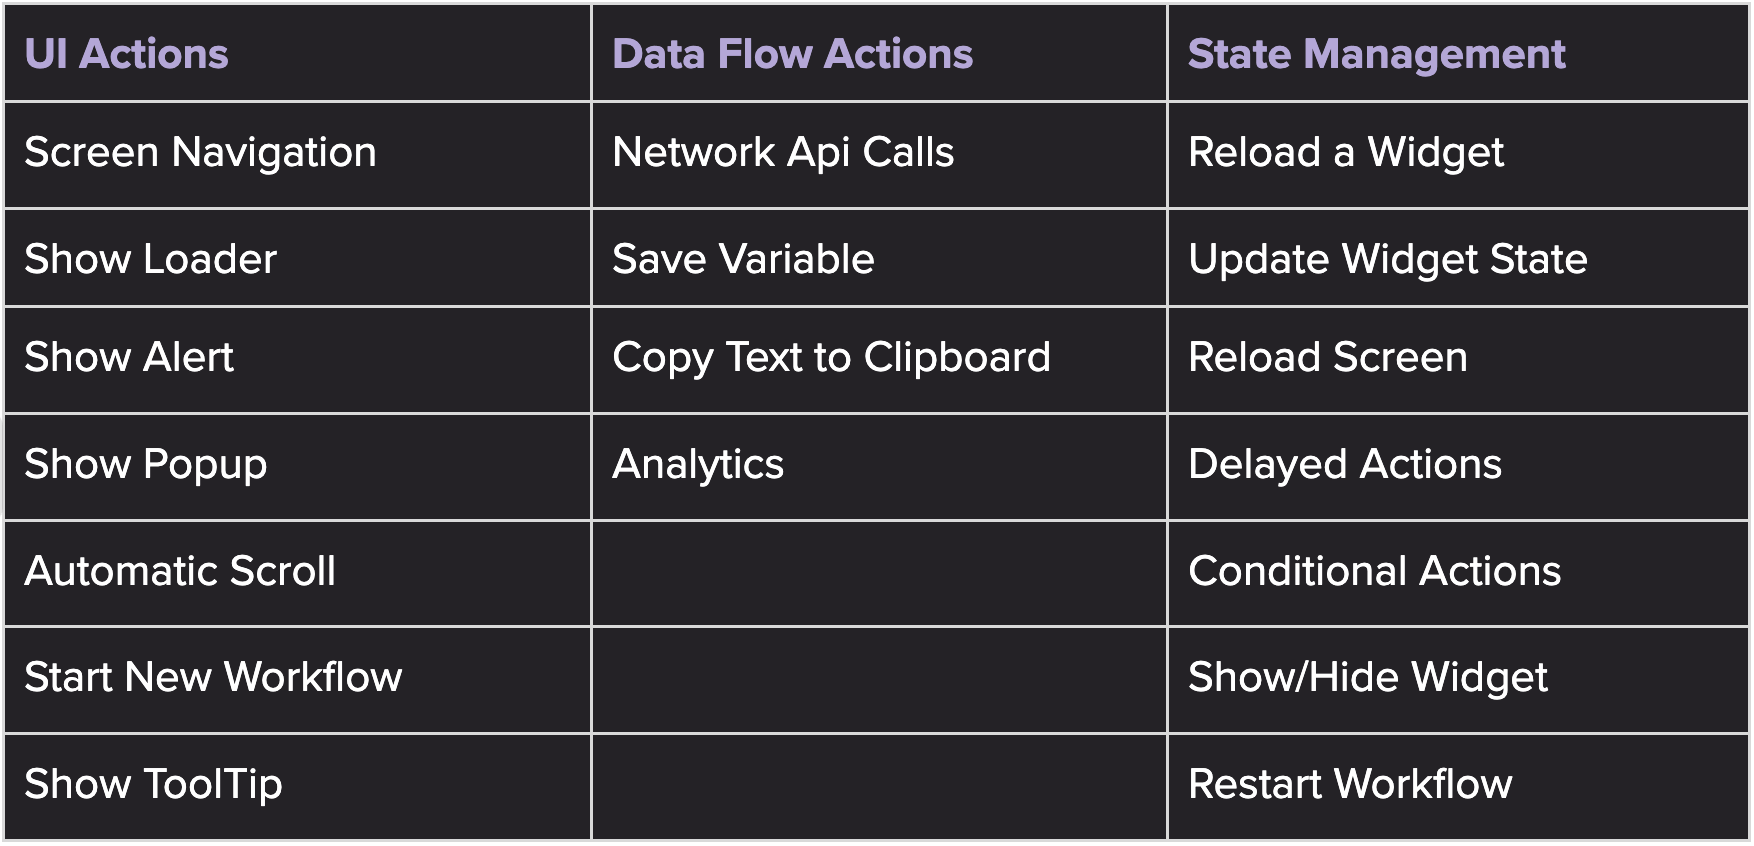
Some of the actions supported by LiquidUI Framework:
Just like widgets, actions also have defined attributes and a similar attribute inspector UI on the web console, allowing developers to assign both static and dynamic values.
Developers can create multiple actions and link them to widgets by referencing action Identifiers within the widget’s attributes. For instance, the ‘onClickActionIds’ attribute of a button widget supports an array of action IDs, which are triggered sequentially upon a user tap. LiquidUI’s event handling creates a chain of actions and serially executes them.
Developers aren’t limited to predefined actions; they can create custom actions to meet specific needs. This flexibility allows the implementation of custom business logic, such as performing CRUD operations on a local database, ensuring that LiquidUI can adapt to a wide range of use cases and requirements.
LiquidUI also supports defining rules that facilitate inter-widget communication. This means that user interactions in one widget can trigger changes in another, like enabling a button when data is entered in a text field.
In the animation below, notice how the ‘VIEW PLANS’ button becomes enabled once the user fills invalid values in the age and pincode fields.
Here’s how it works: a rule listens to both the Age and Pincode widgets, evaluating an expression (in this case an AND Expression) to check if both contain valid values. If the conditions are met, the rule triggers the “Update Widget State” action, enabling the button. Otherwise, the button remains disabled.
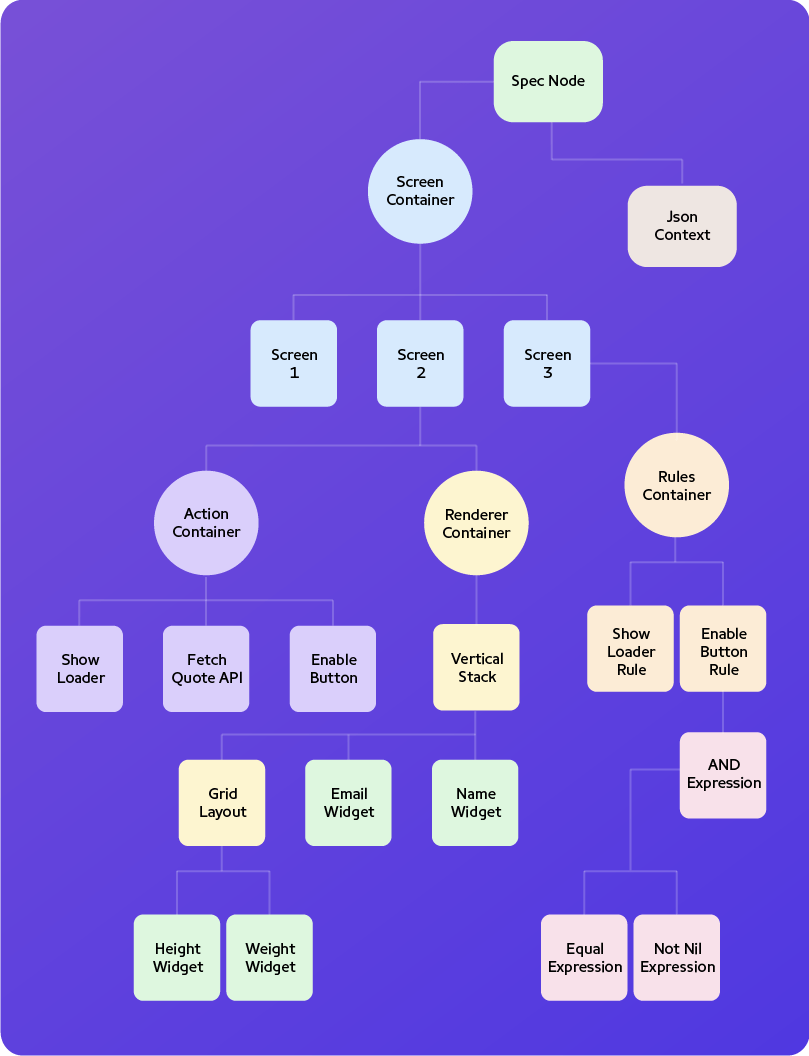
We have explored various components and concepts of the LiquidUI Toolkit. Now, let’s see how these pieces come together to power a server-driven workflow. The diagram below illustrates a sample spec tree, providing a clear overview of how these elements interconnect.
When we started the project, we didn’t find clear alternative frameworks that met our needs. Recently, we revisited this to see if there were any new frameworks available that we could use or borrow from. Here is a quick analysis of what we found and why some of the existing frameworks don’t work for us:
With a powerful UI builder and an extensive toolkit, developers can now swiftly craft server-driven workflows. It’s a significant paradigm shift for app developers transitioning from native development to LiquidUI’s server-driven UI development. This shift changes many aspects of the development process and introduces new challenges.
In the next blog, we will delve into these challenges and how we overcame them. We’ll also explore the various tools we’ve built on top of LiquidUI to streamline debugging, UI automation, and much more.
Stay tuned for the next part!